Showing posts with label Project 3: Processing. Show all posts
I've finished my game and I'm really happy with the end result I think its all come together and I cant believe I only made it in one week! You can play the final version here. (I have not embed the game as it may take a little while to load on some computers please click the link to play).

When I uploaded it to openprocessing it dose not work very well but I if you download it from open processing it works fine so I suggest you do that then launch the index.html within the applet folder.
- Leave your comment • Category: Project 3: Processing
- Share on Twitter, Facebook, Delicious, Digg, Reddit

I have chosen to keep quite a strong style on my game as I think it will help it be recognisable. As my game as developed It has ended up that I now see it as the player being at the bottom of a "bottemless" pit which they are trying to climb out of. so when I picture the platforms, ground and walls they are made of rocks and dirt. To represent this I have chosen a earthy red pallet as it is more exaggerated than brown.
With my platform designs I have kept a rough pixelated edge as a reference to retro computer games and the audio which I have in the game. I have done the same with my sprites which I drew using a 1 pixel pencil tool in photoshop. In processing I stretched this to be the same size as the collision detection rectangle which is invisible behind the image.

For the ground I created a reverse of the bottom of the platforms, I chose to have these appearing above the collision area to create a sense of depth.

my character is meant to be a little boy, but also looks a bit like a miner. I was inspired by Mario and Mega Man when I was sketching designs for him. I only created 4 different states as I use the ones where he is stepping as the jumping sprite. Its not a true sprite as they are 4 separate images but I chose to do it this way as it was a method which I fully understood.


With it in mind that it was a pit I chose to call my game pitFall as it reminded me of the simple 1 or 2 word game titles of retro games like breakout, astroids, pac man, space invaders. I wanted the splash screen to show that it was a homemade game and also be slightly fun so I made up this for it, I also wanted it to have a rough pixelated edge so that it didn't look out of place with the other elements I had drawn.

I picked the font Volter (Goldfish) for its block characters and retro computerised lettering I using processing I converted the film into a .vlw file which I could then load into processing using PFont. To create simple shadows on text I wrote the line twice then offset the one behind and darkened the colour.

To add a little humour into the game for the end screen I made a little splat image which I overlaid over the word splat instead of saying gameover. this help you get an idea that you are climbing out of something and that you have fallen down and hit the bottom where you started.

- Leave your comment • Category: Project 3: Processing
- Share on Twitter, Facebook, Delicious, Digg, Reddit
A really important part of game play to me is sound it really helps bring you into the world of the game. I wanted to have background music playing as well as sounds when you do certain actions.
For the background music I chose a track which by the artist Maru which has a fast tempo to keep the game exciting and also had the classic retro sound of an 8 bit game.
To generate sound effects Seb suggested a great tool called Sfxr which you can use to generate and manipulate low fi sounding noises. Using this tool I created a sound for the standard jump, wall jump and one for a game over noise.
To load sound into processing I used Minim which is a library which gives you a set of functions you can call in order to load sound. To work out which functions I needed I looked through the javadocs and also looked at the online examples provided. I wanted to make sure I fully understood what I was putting into the code so when I found a work example I then found the function within the javadocs and read up about it.
- Leave your comment • Category: Project 3: Processing
- Share on Twitter, Facebook, Delicious, Digg, Reddit
To make the platforms appear more natural I added in a random starting position for them in doing so the issue sometimes arises where you can be left with nothing to do because of the computer. To get arround this and to add more interesting gameplay I had decided to add in the ability to wall jump. Wall jumping will let you boost upwards one platform but in doing so you will have to skip some platforms and therefor miss out on getting points for the high score.
To make people want to continue playing I have included a current highscore on the game over screen, which lets them see the highest score they have gotten that session and encourage them to beat it.
- Leave your comment • Category: Project 3: Processing
- Share on Twitter, Facebook, Delicious, Digg, Reddit
After being confused about what was causing it for ages It turned out to be that I was simply apply my jump height to the wrong variable and instead of adding it to the speed I was adding it to the position.
- Leave your comment • Category: Project 3: Processing
- Share on Twitter, Facebook, Delicious, Digg, Reddit
The next thing I added was a game over condition when ever you reached the bottom of the screen. I then changed my array to generate a large amount of block so that I would have a playable game. you can play this version here.

The issue with this version of the game is that there are too many blocks on the screen so it is not difficult however at the same time because they are spawned randomly occasionally you can get screwed over by the computer and be forced to lose as there are no reachable platforms.
I got some friends to game test this version of the game and they said the same things and also suggested I change the aspect ratio of the game. so following this advice I used a forloop within my platform generating array to draw two staggered columns of platforms.

can be seen in motion here.
- Leave your comment • Category: Project 3: Processing
- Share on Twitter, Facebook, Delicious, Digg, Reddit
I have decided to build my game in a method similar to the web design process of progressive enhancement where I get the basics working then build up from there as far as I can get. The first thing I have done is to create a platform class and a player class.
This is a still of how far I have gotten, you can play it here.

I have gotten the player to be controllable using the left and right keys however I was having issues with the jump. Currently you can jump once but as soon as your land it breaks because of how I have set up my code. Seb has created a section of the website where we can post our wip files for feedback and support, so I put my game up there and seb has advised me to do the following:
You shouldn't mess around with spacePressed other than to poll if the space is pressed :)
So when you check spacePressed, you also need to check whether it's possible for the player to jump at that time. And it's possible for the player to jump only if he is currently on a platform. So I would create a boolean for that within the player object.
I followed Seb's advice I managed to get it working however the jump was not going up smoothly into the air, instead it would just teleport upwards equal to the value of my jumpheight variable. I decided to leave it and start work on building some of the other parts of the game as I could not figure out the issue.
- Leave your comment • Category: Project 3: Processing
- Share on Twitter, Facebook, Delicious, Digg, Reddit
I though some more about my initial Idea and have decided that because we only have a week to build and complete our game I need to simplify my initial idea otherwise I will not be able to complete it.
I am keen to still have it based around jumping have a character with a sprite so to reduce the complexity of the game I am going to have it so that nothing happens if you reach the top of the screen you just have to wait for another block to start falling. I also plan to have my astroids be based on flat blocks so that I don't have to work out complicated collisions as I don't think that would add much to the gameplay in such a simple game.
- Leave your comment • Category: Project 3: Processing
- Share on Twitter, Facebook, Delicious, Digg, Reddit
The first thoughts that I had when I though about what game I would make is that it should be based on some form of physics instead of a levelling system, the goal of the game should be just to get as high a score as possible. Doing this would allow me to have fun gameplay but not have something which is out of my coding ability.
I have two younger sister who both enjoy playing flash games online so for research I went to the site which they go to Friv.
The I of It
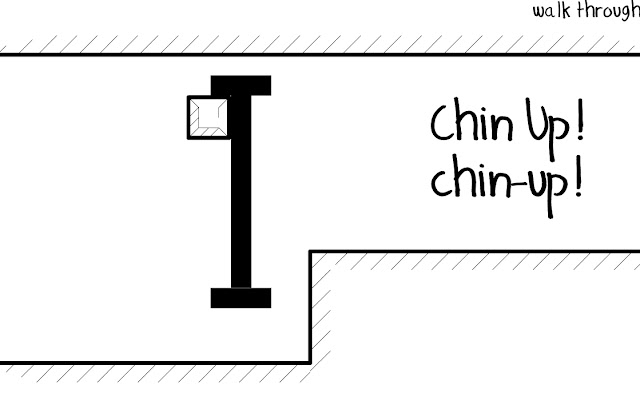
In this game you play the letter I in a puzzle platformer. you can change your height to hook onto block and get around obstacles. This game has a really clean style and a friendly voice over however it dose have a leveling system and was not really what I'm looking for.
Color Theory

Again this was another level based platformer but this had a really interesting game mechanic where by walking into the coloured crosses you could change the colour of your character allowing you to pass through objects of the same colour. I really like the simple sprites and block colours in this game.
Initial Idea
Thinking about what was the difficult parts of games I thought about the amount of times I have died when trying to jump gaps so I thought it would be both fun and interesting to build a game based around jumping.
I also really like the look of the game asteroids so I imagined that you could have a game where instead of destroying the astroids you had to jump from one to another as fast as you could as they fell out of the sky.
I would have a score system based on how many you had jump form. You would be able to get higher up the astroids and if you reached a certain hight you would be reset back the the middle and get a score bonus.
- Leave your comment • Category: Project 3: Processing
- Share on Twitter, Facebook, Delicious, Digg, Reddit
Our final day was really good we reviewed everything we had learnt so far and talked about how to go about building our games. I really enjoyed all the lessons with Seb and feel like I have learnt loads. I have been really inspired to see what I can do with what I've learnt. I also want to see that potential there is for building something which has a physical outcome.
One really useful thing we learnt on the final day which is specific to a game is how to make a scoring system. This is actually really easy, it works by creating a variable which you then add to it when ever some one scores. You can display the value of the variable by putting it within the text function.
Seb told us that the main thing he was looking for is gameplay experience and FUN. if we create something which is really complicated but not fun we will not get any marks for the complexity in fact he wants us to keep our code clean and try and do things efficiently.
- Leave your comment • Category: Project 3: Processing
- Share on Twitter, Facebook, Delicious, Digg, Reddit
In our 4th lesson we learnt about particles and how to create a particle system. Particles use objects arrays and forloops to allow you to draw large numbers. Then within the object you create a physics system for your particles such as gravity which affect how they appear on screen. By doing this you can make fountains, explosions, smoke, etc
Here are some examples of what Seb showed us you can do with particles;

This example makes particles which reduce in size and slow down the further away they get from the start point. To get the fathered edge you can load in an image to be used as the particle instead of using Processing's drawing functionality, you do this with PImage.

This second example makes particles with a negative value of gravity so they travel upwards. As the particles get further away from the source they increase in size and become more transparent.
- Leave your comment • Category: Project 3: Processing
- Share on Twitter, Facebook, Delicious, Digg, Reddit
At the end of the 3rd lesson we where set another homework assignment. For this one we had to put into practice what we had learnt about arrays and objects by creating some buttons which would be clickable and change colour when pressed.
I wanted to give me self a bit more of a challenge so I decided that I would make the buttons stop on click as well as change colour. For an even bigger challenge I also wanted to have the balls collide with each other!
To get by buttons to stop when clicked I created a method (the name for functions within objects) which would check the current position of the mouse and if it was within a circle reduce the speed of it to 0. When clicked again I wanted them to carry on moving they way they where before I tried to do this by making a variable which would save the speed and direction of the button, however I could not get this method to work as it kept breaking everything else and I could not figure it out!
when it came to trying to make the bubbles to collide with each other I approached it by thinking that I would check for if the area of the button overlapped with another it would reverse its direction giving the illusion of a collision. However I couldn't work out how to check if a circle made from the object was touching another circle also made by the object. After spending a while trying several different approaches I called it a day as I had already done what the homework had asked me to do and I was getting no where with adding in extra collision.

you can fine the live project here.
- Leave your comment • Category: Project 3: Processing
- Share on Twitter, Facebook, Delicious, Digg, Reddit
In the second lesson after the christmas break we started off by learning about functions. functions allow you to record a set of actions will will happen each time you call the function in your code. using functions you can do things like calculate positions with varying numbers or draw elements.
From functions we moved onto objects which are an important part of programming. a good description of what an object is that it is a cookie cutter which will allow you to make as may cookies as you want fitting the description of the cutter. With an object however you can pass in multiple values which means that you can changes the values of the variables it contains and by doing so affects the look and properties of the item created by the object.
In class we created a simple bouncing circles object which allowed to to draw as circles just by calling the object. Using objects allows you reduce the amount of code that you need as you do not have to write the same things over and over.
We then started to learn about arrays which also allow you to reduce the amount of code you need to write. Arrays as like variables but instead of storing a single piece of information they store multiple. We combined arrays, objects and forloops to allow us to draw any amount of the same object just by changing the length of the array. Doing this I was able to make 50,000 tiny circles that would all bounce around the screen at once!
- Leave your comment • Category: Project 3: Processing
- Share on Twitter, Facebook, Delicious, Digg, Reddit
We have had our brief and it challenges us to develop our programming skills and to push our projects as far as we can take them. The brief reads;
This module aims to give students experience of programming interaction in order to develop a sense of code literacy, which will enable them to push the boundaries of design to include new realms and processes. During this module you will be taught Processing and learn the very basics and begin to develop your programming skills. You wll be given a series of exercises to do in the class and some projects to do outside of the class. You will be asked to upload these projects onto the Open Processing website classrom. The projects can do developed and pushed as far as you like. You must also research how Processing is used and comment on projets that have used this kind of programming. Your research should include some interactive projects. You must demonstrate your learning development on your blog through commentary and a posting of classroom assignments.
We are going to be assessed on 3 key sketches, Alien, eyes, and game. They want to see our progress and will be marked with it in mind that we had only just started learning processing.
- Leave your comment • Category: Project 3: Processing
- Share on Twitter, Facebook, Delicious, Digg, Reddit
For our first lesson back after Christmas we just recapped everything we had learnt so far which was actually really helpful as we where asked to code certain things from memory and I feel like now I can think of the solutions to simple coding problems because I have worked on them myself and had to spot simple errors in my own code.
- Leave your comment • Category: Project 3: Processing
- Share on Twitter, Facebook, Delicious, Digg, Reddit
Our tutor Seb has set up a classroom for us on openprocessing. This is a place where he can post working examples of the projects we worked on in the day and we can look at the outcome and also review the code so we can remind ourselves how parts of it work. It also a space where he can put up assignments for us to do and he gave us one to do over the Christmas holidays so that we would not forget everything we had learnt so far.
We where asked to create a pair of expressive eye. These eyes should at least one of two thing, follow the mouse as it moved around the screen and blink if you clicked. we could create the eyes to look like anything we wanted really with suggestions of human, alien, insect, robot!
I chose to do mine as a pair of human eyes. I wanted them to look bold and graphical so I chose to use the beginShape() function to let me build up some interesting polygons. I chose to build the eyes using variables of fraction of the width and height of the project so that once I had finished building I would be able to alter the size of the project and by doing so change the appearance of the face.
To get the eyes to follow the mouse I use a function called
map() which allows you to change values from their current range to another one. By doing this I could change the values of the mouseX and mouseY positions to be changed to the area I wanted my pupil to move around in.
I chose a bland pale skin tone then had dark areas around the eyes which could be viewed as the sunken area around your eyes or are some form of makeup or warpaint.
For the blink I use a boolean variable which is either true or false to test if the eyes where closed or not in an if statement, it would then change the position of the lower part of the top eyelid covering the eyeball.

You can view the full project here.
- Leave your comment • Category: Project 3: Processing
- Share on Twitter, Facebook, Delicious, Digg, Reddit
Learning to draw things in processing that require more detail than a single shape was quite confusing at first. It works on a coordinated system which if you have ever done any html is similar to the way you would position absolute elements.
It works by giving the objects a X and Y value, the top left of the canvas is at point 0,0 and the bottom right if you where working on a 500px square project would be at 500,500 (you can also way "width,height" as that they are read by the computer as the size dimensions of your project).
We where asked to draw a creature in the first lesson which should be in the center of the canvas this meant that we had to figure out how far away certain points where from the center of the project on both the x and y axis which if your not used to doing it is a really odd thing to think about.
here is a still of the creature I made, as you can see its a pirate and that eye patch was rather confusing. you can see the actual project on openprocessing.org.

If your interested this tutorial on processing.org do a good job of explaining the basics, you can also see where the draw a creature came from!
- Leave your comment • Category: Project 3: Processing
- Share on Twitter, Facebook, Delicious, Digg, Reddit
Our first day with processing was taught by one of our regular tutors Andrew, the aim was just to get familial with what the software and programming language looked like. I had no idea what to expect and after drawing a few simple objects mapped to the mouse was left wondering how you would then take that forward and build some more complex interactions.
We then had our first day with Seb and he introduced us to the very basics. After explaining something he would get us to all code along with his demonstrations. it felt like we covered quite a lot of ground in the first few lessons. the areas we covered where:
- The basics of the coordinate drawing system
- how to create a simple drawing tool
- Variables - a way of storing values and data to be used in multiple places
- conditionals - a way of testing if something has happened and then to do something if it has
- for loops - allows you to do multiple actions at once
After the first few lessons I was really excited with everything which we had learnt and believed that with the information we had learnt so far it would be possible to build a simple game such as breakout!

- Leave your comment • Category: Project 3: Processing
- Share on Twitter, Facebook, Delicious, Digg, Reddit
There are lots of examples of great projects on processing. It gets used to build interactive installations
and visualisations of data.
This interactive installation show how Max Planck Institutes collaborate. it takes date from over 94,000 publications from over the past 10 years which is a really large amount of data. This date is then represented graphically with "the size representing the number of scientific publication, and the width of the connecting lines the number of jointly published papers between two institutes" (source).
It is also used to made generative art work such as this piece by Christian Flaccus which I found on Jer Thorp's blog.

I saw Jer Thorp speak at flash on the beach about Project Cascade which visualises the spread of sharing activity through social media.
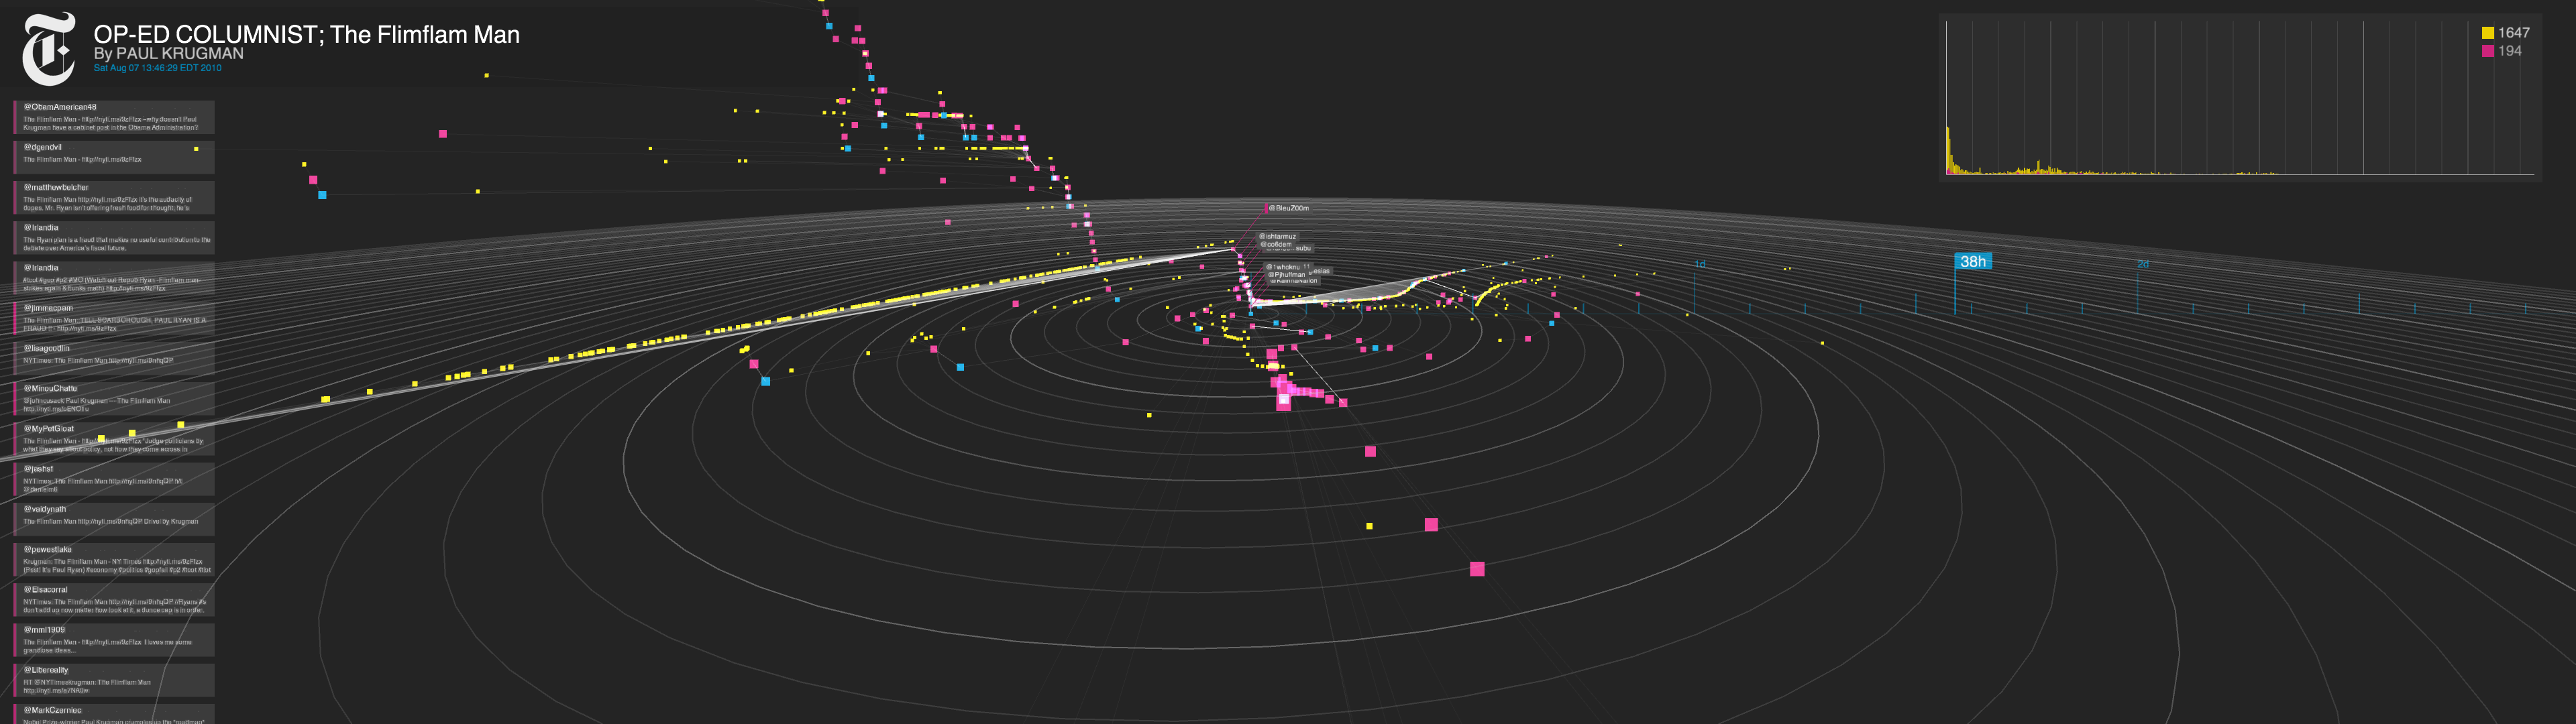
- Leave your comment • Category: Project 3: Processing
- Share on Twitter, Facebook, Delicious, Digg, Reddit
So i've been away from the blog for a little while and thats because for our new project we are focusing on learning a new piece of software called processing and have been getting special tuition from Seb Leedelisle.
Processing is a programming language, development environment, and online community that since 2001 has promoted software literacy within the visual arts. Initially created to serve as a software sketchbook and to teach fundamentals of computer programming within a visual context, Processing quickly developed into a tool for creating finished professional work as well.
we are being taught the basics of coding and have just found out that the outcome for the project will be to create a simple game! which is really exciting.
- Leave your comment • Category: Project 3: Processing
- Share on Twitter, Facebook, Delicious, Digg, Reddit